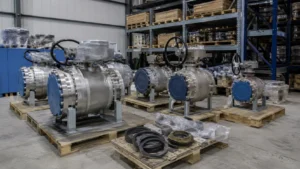
Use Condition, Not Age, to Decide What to Do
The periods below are practical review points, not manufacturer shelf-life limits.
| Storage Period | Storage Condition | Practical Action |
|---|---|---|
| Under 1 year | Dry indoor storage, original protection intact | Complete receiving and normal pre-installation checks. |
| 1–3 years | Preservation records available | Inspect the bore, flange faces, sealing areas, stem and actuator. |
| 3–5 years | Controlled long-term storage | Use a more detailed inspection and complete any testing required by the OEM or project. |
| Over 5 years | Long-term stored equipment | Review seal materials, preservation history, spare-parts availability and required testing before acceptance. |
| Any age | Water ingress, missing covers, heavy corrosion or contamination | Stop installation and inspect the valve. |
Do not turn 1, 3 or 5 years into automatic rejection limits. API 6D and ASME B16.34 also do not give ball valves a universal warehouse expiration age.[4][5]
Use Storage Records to Establish the Real Storage Period
Do not calculate storage history from the nameplate year alone. Check these 7 dates where records are available:
- manufacturing date;
- factory test or FAT date;
- shipment date;
- site receiving date;
- start of long-term preservation;
- preservation renewal dates;
- retesting or repacking dates.
A valve manufactured in 2023 may have remained under controlled factory preservation until shipment in 2025. A valve manufactured in 2025 may already have spent a year outside on a construction site. The second valve can require more inspection even though it is newer.
For surplus valves or valves transferred from another project, also check whether they were previously opened, pressure tested, dismantled or exposed to process fluid.
Record These 8 Items When the Valve Arrives
- tag number and serial number;
- nameplate condition;
- crate and packaging condition;
- flange covers, plugs and caps;
- visible transport damage;
- water or condensation;
- visible corrosion;
- valve and actuator position.
Take photos of large or expensive valves. If rust, damaged packaging or missing covers are found 2 or 3 years later, the receiving photos provide a useful comparison.
If an end cover must be removed during receiving inspection, inspect the valve in a clean area and restore the protection before returning it to storage.
Keep Water, Dust and Impact Away from the Valve
Store industrial ball valves indoors where practical. Keep them dry, clean, off the floor and protected from dust, chemicals, rain and handling damage.
Large valves should remain on their original skid or suitable supports. Do not support the weight of the valve through:
- the stem;
- gearbox or actuator;
- drain or vent fittings;
- injection fittings;
- small-bore tubing.
Check for condensation even in indoor warehouses. Temperature changes can cause moisture to form on metal surfaces and collect in low areas, body cavities or actuator housings.
If the packaging uses desiccant, barrier film or humidity indicators, maintain them according to the preservation instructions. Replace or repair damaged moisture protection instead of leaving torn packaging in place.
Outdoor storage needs more frequent inspection. A loose tarpaulin can stop direct rain but still trap humid air around the crate.
Leave End Covers On Until the Valve Is Needed
Flange covers and port plugs protect the sealing areas from four common construction contaminants:
- weld slag and metal chips;
- grinding dust;
- sand and rust scale;
- wood, plastic and packaging debris.
A hard particle trapped between the ball and seat can cut a soft seat or scratch the ball during the first 90° operation.
CARILO’s guide on how to flush a pipeline without damaging ball valve seats explains how weld slag, metal chips and other debris can reach the sealing area.
If a flange cover is missing, inspect the bore before installing another cover. Look for:
- standing water;
- rust staining;
- hard particles;
- damaged seat edges;
- scratches on visible ball surfaces.
Inspect the flange gasket-contact area for pitting, impact marks and deep scratches. Butt-weld valves also need protection over the bore and machined weld bevel. Threaded and socket-weld ends should remain capped or plugged.
Return the Ball to the Correct Storage Position
A normal on-off ball valve moves approximately 90° from fully open to fully closed. Store it in the position specified by the manufacturer.
Do not leave the valve at an arbitrary partly open angle for long-term storage. The partly open position changes seat contact and exposes more of the ball and seat edge to contamination entering through the ports.
If the valve is operated during inspection, return it to the specified storage position afterward.
Do not cycle a dirty valve repeatedly. Remove or assess the contamination first. Hard particles around the seat can be dragged across the ball during rotation.
Check Each Seal Material Separately
A ball valve can contain several different sealing materials. They should not be given one common shelf-life number.
| Seal or Surface | Main Storage Concern |
|---|---|
| PTFE / reinforced PTFE seat | Long-term deformation, contamination and mechanical damage |
| PEEK or engineered polymer seat | Contamination, scratches and incorrect loading |
| NBR / FKM / EPDM O-rings | Compound aging, compression and unsuitable environmental exposure |
| Stem packing | Compression, contamination and leakage around the stem |
| Graphite | Physical damage and contamination |
| Metal seat surfaces | Corrosion, scratches and hard debris |
ISO 2230:2026 gives guidance for storing vulcanized and thermoplastic rubber products and components.[1] It does not provide one expiration period for every sealing material inside an assembled ball valve.
Elastomer O-rings can change during long storage because of temperature, chemical exposure, environment and continued compression. The actual compound matters; two O-rings carrying the same broad material name are not automatically identical.
PTFE behaves differently from rubber. Under sustained load, PTFE can show time-dependent deformation or cold flow.[2] The effect inside a valve depends on the seat design, reinforcement, preload, temperature and storage position.
Do not automatically replace every seat, O-ring or packing set after 3, 5 or 10 years. Replace parts when the OEM requires it, damage is found, the valve has been dismantled, leakage testing fails or storage conditions were poor.
Look for Different Damage on Soft and Metal Seats
For a soft-seated ball valve, check these 6 points:
- foreign material around the seat;
- visible seat deformation;
- scratches on the ball;
- higher-than-expected operating torque;
- water or rust inside the valve;
- damage caused by poor handling.
The visible edge of a soft seat can look normal while another part of the sealing contact is damaged. A valve can also complete its full 90° movement and still leak across the seat.
Do not use files, abrasive pads or screwdrivers on soft seats or polished ball surfaces.
For a metal-seated ball valve, focus more on corrosion, hard particles, coating damage and scratches on the metal sealing surfaces.
Do not repeatedly cycle a contaminated metal-seated valve to try to clear the debris. Inspect and clean it first.
Check Trunnion Cavities, Drains and Vents
A floating ball valve normally has fewer internal areas to inspect. Storage checks mainly cover the ball, seats, stem sealing system, body seals and bore.
A trunnion-mounted ball valve can add at least 6 areas:
- trunnion bearings;
- seat carriers;
- seat springs;
- body cavities;
- drain and vent connections;
- sealant or emergency injection fittings.
CARILO’s floating vs trunnion ball valve comparison explains the structural differences.
A clean main bore does not prove that a large trunnion valve is dry internally. Water can remain in a low body cavity or around a drain connection.
Check that drain, vent and injection fittings still have their protective caps or plugs.
Never open a drain or vent unless the equipment has been confirmed unpressurized.
Check the Gearbox and Actuator Separately
Gear operators: check the housing, mounting bolts, position indicator, corrosion and smooth movement.
Pneumatic actuators: check ports, tubing, flexible hoses, solenoid valves, regulators and positioners. Open ports can allow moisture and dirt inside.
Electric actuators: check enclosure seals, cable glands, unused conduit entries, terminals and any required anti-condensation equipment.
Do not overcome abnormal torque with a longer lever or a larger actuator. Find the cause first. CARILO’s guide to ball valve break torque and run torque explains why torque changes during the opening and closing stroke.
For U.S. general-industry servicing and maintenance, OSHA 29 CFR 1910.147 requires hazardous stored or residual energy to be controlled before work starts.[6] This can include electrical power, pneumatic pressure, hydraulic pressure and spring energy.
Keep a Storage Record That Can Support Installation
A useful long-term storage record should contain at least these 10 items:
- valve identification;
- storage location;
- date received;
- inspection dates;
- packaging condition;
- end-cover and plug condition;
- water or condensation found;
- corrosion found;
- valve and actuator position;
- preservation, testing or repair work completed.
If the OEM requires periodic cycling during storage, record each operation. Do not create one cycling interval for every ball valve.
Do not dismantle a valve only because it has been stored for several years. Start with the records, external inspection, accessible bore, valve movement and required tests.
If the inspection finds a real maintenance problem, CARILO’s API 6D ball valve maintenance guide covers seats, O-rings, packing and common replacement parts.
Check These Areas Before Installation
Visual inspection
- Confirm tag number, size, pressure class and valve materials.
- Inspect flange faces or weld ends.
- Check the bore for water, rust and foreign material.
- Inspect visible ball surfaces without scratching them.
- Check the stem, body joints, drains, vents and plugs.
- Inspect the gearbox or actuator.
Functional inspection
- Operate the valve only when the applicable procedure permits it.
- Check the full 90° travel of a normal quarter-turn on-off valve.
- Check for sticking, rough movement or abnormal torque.
- Confirm the local position indicator.
- Check actuator travel and accessories.
Pressure or leakage testing
Use the required test procedure when storage records are incomplete, water has entered the valve, internal corrosion is found, the valve has been repaired or the service requires stronger proof of isolation.
ISO 5208:2015 covers pressure testing of industrial metallic valves, including pressure-boundary and closure-tightness testing.[3]
The test pressure, medium, holding time, direction and leakage acceptance limit must come from the applicable standard, approved valve procedure and project specification. Do not use a general percentage or guessed field pressure.
If leakage is found, identify whether it is seat leakage, stem leakage or flange leakage before deciding what to repair. CARILO’s ball valve leakage diagnosis guide covers these separate leak paths.
Retest the Valve When These Conditions Are Found
- storage records are missing;
- the valve has been stored for several years without a documented preservation program;
- an end cover was missing;
- water entered the bore or body cavity;
- internal corrosion is visible;
- operating movement is abnormal;
- the valve has been dismantled or repaired;
- failure to isolate the process would have serious consequences.
A valve that moves through 90° without difficulty can still have seat leakage.
API’s current documentation identifies API Specification 6D as the 25th Edition, November 2021, with Addendum 3 issued March 5, 2025.[4] API 6D should be used with the purchase specification and approved inspection and test procedures; the API 6D name itself does not give the valve a storage expiration date.
ASME B16.34-2025 covers requirements including pressure-temperature ratings, materials, dimensions, testing and marking for applicable valves.[5] It also does not set a universal warehouse age at which a ball valve must be discarded.
Re-Preserve the Valve After Liquid Testing
If the valve returns to storage after a hydrostatic or other liquid test, complete the required preservation work before closing the crate.
- drain the test liquid;
- remove trapped liquid from permitted low points;
- dry internal areas where required;
- check for residue or contamination;
- renew approved corrosion protection if required;
- return the ball to its specified storage position;
- replace flange covers, caps and plugs;
- restore moisture protection;
- record the test and new preservation date.
Do not leave test water trapped inside a carbon-steel body cavity for another long storage period.
Quarantine the Valve When You Find These Problems
| Finding | Action |
|---|---|
| Standing water inside the valve | Quarantine and inspect the internal surfaces. |
| Heavy internal corrosion | Do not install until the damage is assessed. |
| Corrosion or scratches on sealing surfaces | Assess, repair or test before installation. |
| Damaged soft seat | Replace or repair according to the valve procedure. |
| Abnormal operating torque | Find the cause before applying more force. |
| Missing or unreadable identification | Confirm the valve specification before installation. |
| Damaged flange gasket surface | Assess whether repair is required before assembly. |
| Contaminated oxygen-clean or special-clean valve | Restore the required cleanliness before use. |
| Unknown storage history on critical-service valve | Use a stricter inspection and testing scope. |
If the valve needs replacement seats, packing, spare parts or technical inspection, CARILO’s industrial valve service page covers inspection and replacement-part support.
Compare These Storage Cases Before Accepting a Valve
| Valve | Condition | Decision |
|---|---|---|
| 2 years old | Indoor storage, intact covers, complete records, clean bore | Complete normal pre-installation inspection and required tests. |
| 8 months old | Outdoor storage, cover missing, water staining inside bore | Inspect internally; quarantine if corrosion or seat damage is found. |
| 5 years old | Controlled preservation, complete records, no water ingress | Age alone is not a rejection reason; inspect and follow OEM/project testing requirements. |
| 6 years old | Trunnion valve, good records, important high-pressure isolation duty | Use detailed inspection and the specified pre-installation test scope. |
Finally
A stored ball valve should be accepted from its condition, not from one calendar number. Check at least the bore, end covers, flange faces, ball and seats, stem, body cavity and actuator before installation. A standard on-off valve should complete its normal 90° travel without sticking or abnormal torque, but movement alone does not prove seat tightness. Long storage with clean records can still be acceptable; standing water, heavy internal corrosion, damaged sealing surfaces or unknown history on a critical-service valve should trigger quarantine, inspection and the required leakage or pressure testing before the valve enters the pipeline.
References
- ISO 2230:2026, Rubber products — Guidelines for storage: https://www.iso.org/standard/89162.html
- National Institute of Standards and Technology, technical information on PTFE deformation and cold-flow behavior: https://nvlpubs.nist.gov/nistpubs/Legacy/IR/nbsir79-1624.pdf
- ISO 5208:2015, Industrial valves — Pressure testing of metallic valves: https://www.iso.org/standard/65111.html
- American Petroleum Institute, API Specification 6D, 25th Edition, Addendum 3: https://www.api.org/-/media/files/certification/monogram-apiqr/0_api-monogram-apiqr/advisories-updates/addenda-errata/api_specification_6d_25th_edition_addendum_3_20250312.pdf
- ASME B16.34-2025, Valves — Flanged, Threaded, and Welding End: https://www.asme.org/codes-standards/find-codes-standards/b16-34-valves-flanged-threaded-welding-end
- OSHA 29 CFR 1910.147, The Control of Hazardous Energy (Lockout/Tagout): https://www.osha.gov/laws-regs/regulations/standardnumber/1910/1910.147